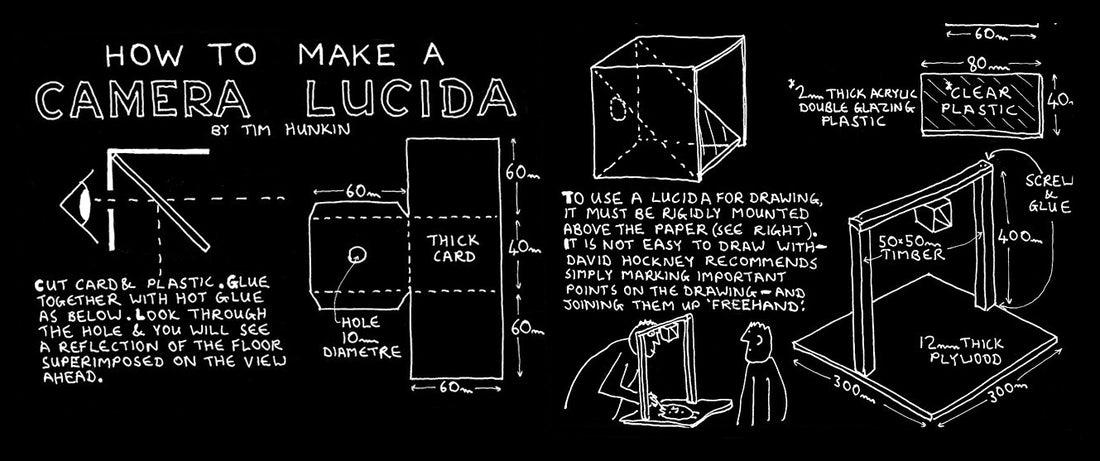
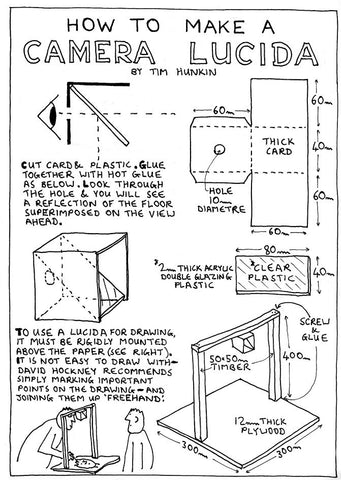
A DIY Guide to make your Camera Lucida
The Camera Lucida, a classical artistic tool that has bridged the worlds of art and science since the 19th century, continues to fascinate and serve artists around the globe. Traditionally, it comprises an optical device used to superimpose a subject view onto the artist's drawing surface, enabling precise replication of scenes and objects. In an era where technology enhances traditional techniques, creating your own Camera Lucida can be a rewarding project that combines historical artistry with personal craftsmanship.
Understanding the Basics
Before embarking on, it's essential to grasp how a Camera Lucida functions. The device typically uses a prism or a set of mirrors to project the image of an object onto a surface, allowing the artist to trace the image with remarkable accuracy. The key to a successful DIY Camera Lucida is creating a system that provides a clear, stable image projection that can be easily traced.
Materials Needed
- Optical Prism or Mirrors: The heart of your Camera Lucida. A high-quality prism or a set of mirrors will reflect and refract the light to project the subject onto your drawing surface.
- Adjustable Stand: To hold the prism or mirrors above your drawing surface. This could be a camera tripod, a lamp stand, or any DIY stand that allows for height and angle adjustments.
- Clamps or Holders: To securely attach the prism or mirrors to the stand.
- Black Cloth or Hood: To create a shaded viewing area that enhances the visibility of the projected image.
Step-by-Step Guide
-
Assembling the Stand:
- Begin by setting up your stand. Ensure it's sturdy and adjustable. A camera tripod is ideal due to its stability and flexibility.
-
Attaching the Prism or Mirrors:
- Securely attach your optical prism or mirrors to the stand using clamps or holders. If you're using mirrors, you'll need two: one to reflect the subject onto a second mirror, which then reflects the image down onto the drawing surface.
-
Positioning the Device:
- Adjust the stand so the prism or mirrors are directly above your drawing surface. The height and angle depend on your specific setup and the size of the image you wish to project.
-
Creating a Viewing Area:
- Use a black cloth or hood to create a shaded area around the viewing side of your Camera Lucida. This enhances the visibility of the projected image against the drawing surface, especially in well-lit environments.
-
Testing and Adjusting:
- Place an object to draw within the line of sight of your Camera Lucida. Look through the prism or mirrors and adjust the stand, prism, or mirrors until you can see a clear projection of the object on your drawing surface.
- Experiment with different lighting conditions and backgrounds to achieve the best visibility for your projections.
Tips for Success
- Quality of Optics: The clearer your prism or mirrors, the sharper your projected image will be. Consider investing in high-quality optical components for the best results.
- Stability is Key: Any movement can disrupt the alignment of your projection. Ensure all components are securely fastened and the stand is on a stable surface.
- Practice Makes Perfect: Familiarize yourself with the nuances of your DIY Camera Lucida. Practice drawing with it to understand how to best utilize its capabilities.